Entry Periodic Arrivals
This Entry mode is simple to specify, and good for beginners to get started with.
Periodic Arrival events cause items to arrive over a period of time, such as customers at a bank.
You specify a Start and End time, plus a time interval between item arrivals, and if desired, a limit on the total number of items to be created. The inter-arrival time can have a variation pattern applied to it.
Periodic Arrival Entry Notes:
- A Periodic Arrival Entry will produce one item per arrival event.
(Refer below for creating batched arrivals)
- If the Entry is blocked for an arrival event, the arrival event is cancelled and no item is produced.
(Subsequent Arrivals events will attempt to produce items)
Specifying Periodic Arrivals
Periodic Arrivals are defined for entries in Object Edit View using the Arrival Details option in the Entry's Object Edit Menu.
The Item Class Produced will be the one whose path leaves the Entry.
To produce a different class, remove the first class’ path and add a path from the Entry for the new class.
Editing a Periodic Arrival
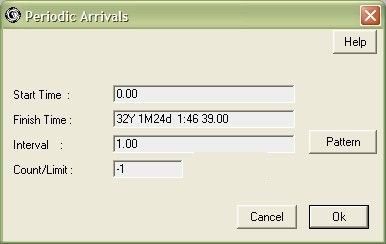
Click on the Arrival Details option in the Entry's Object Menu, to display the following dialog:
- Specify a Start Time, and an End Time.
- Production of a series of single items occurs between these two times.
- Specify a time interval that will pass between one item arrival and the next.
- This is called the 'Inter-Arrival Time'.
- You can vary the inter-arrival time. To apply a pattern of random variation to the interval, click on the Pattern button to display a Distribution Pattern Dialog.
- Specify a Count or Limit, which sets the maximum number of items that can be produced - even if the schedule line end time has not been reached.
- If you set the Count/Limit value to -1, no limit will apply to the number of items produced.
How to Create Batched Arrivals
If you want to produce groups of items (i.e. batches) you can put a Splitter object after the Entry. In the Split Schedule, specify how many items you wish to be produced.
If you want the number of items in each batch to vary, you can put a Change object between the Entry and the Splitter, and perform a Routine Operation to set a random batch size value into a Portal Attribute, and then refer to this value in the Split Schedule.
