Item Attribute
Item Attributes are found in the Item Edit Menu of each Item Class. When the Item Attributes option is selected, a list appears. If the list has no entries, a single line appears, prompting you to Add a New Item Attribute. Once some Attributes are already present they are displayed in the list, along with their initial values.
Uses for Item Attributes
Item attributes typically give unique qualities to each individual item within a class.
This uniqueness can be used to further refine the details of how that item behaves within the model, even the behaviour of the model itself.
For example, it would be possible to use an attribute to represent the weight of an item and have the weight affect the delays experienced by that item.
Other uses include path assignment (routing information) based upon an attribute representing sub-types of items in a Class.
Item Attribute Creation and Selection
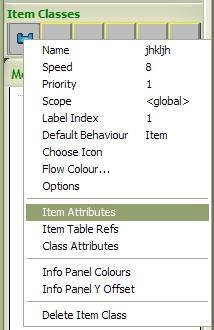
| Right Click on an Item Class in the Item Palette and select Item Attributes from the Menu.
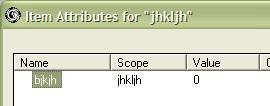
Attributes already present are then displayed in a list, along with their initial values. Right Click to select an Item Attribute to be edited or Click the Add Attribute button to create a new Item Attribute. |
Fields, Settings and Buttons
These are the fields, settings and buttons that are available when creating or editing Item Attributes.
| Field/Setting | Description |
|---|---|
| Name | Enter/Edit the Name of the Attribute.
Attribute names do NOT carry any case sensitivity in Planimate®. |
| Comment | Enter/Edit an optional comment, to guide those who come after you. |
| Initial Value | Enter/Edit the value applied to this Attribute upon the model being loaded. |
| Units | Select a Display format for this Attribute.
Planimate® tries to determine the format automatically. eg. typing 100s or 25:32 or 3d will interpret as a time; typing $123.45 will interpret as money; typing values greater than 60 will interpret as a value. |
| Include in Info Popups | This includes the attribute in the listing of attributes shown in a popup window when you pause the model and clicked on an item. |
| Include in Info Panel | This includes the Attribute’s VALUE only, in a Panel that travels with the item as it animates. |
| Round Values to Integers | Rounding will be applied to any alterations of this Attribute, ensuring that whole integer values are always experienced. |
| Keep Private to this Class | This setting is relevant to item class mapping. If a subsystem contains a class with private item attributes, these attributes are not set or returned to the "external' item class which is being mapping into or out of the subsystem. |
| Enable Range Checking | Provides a bounds checking feature for the Attribute's value. If breakpoints are enabled, going beyond the range limits will cause a breakpoint. If breakpoints are disabled, going out of range will trigger a run time error, and stop the run. |
| Lower Limit | Below this value is out of range. |
| Upper Limit | Above this value is out of range. |
| Attribute | Displays a Menu of Options
|
| Remove | Deletes the Attribute. Warns if any references exist for this Attribute. |


