Customize Portal States: Difference between revisions
mNo edit summary |
mNo edit summary |
||
| Line 9: | Line 9: | ||
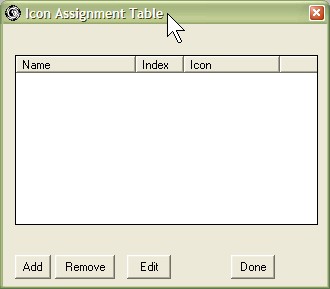
After selecting Customise States, a window appears in which you add and edit the Portal states. | After selecting Customise States, a window appears in which you add and edit the Portal states. | ||
[[Image: | [[Image:State Editor Blank.jpg]]<br> | ||
<br> | <br> | ||
Then you will be offered a window from which you can select an icon the portal will display when it is in this state. | Then you will be offered a window from which you can select an icon the portal will display when it is in this state. | ||
<br> | |||
[[Image:Icon Palette.jpg]] | |||
<br> | |||
After you select an icon, the state is added to the list. | After you select an icon, the state is added to the list. | ||
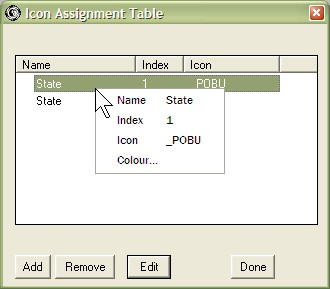
You can then right click on a state to edit its other state parameters: | You can then right click on a state to edit its other state parameters: | ||
*'''Name'''<br>Optional, but it is useful for remembering the state | *'''Name'''<br>Optional, but it is useful for remembering the state | ||
*'''Index'''<br>An integer value. Change this to re-order the state listing. | *'''Index'''<br>An integer value. Change this to re-order the state listing. | ||
*'''Colour'''<br>This is the color name that is reported to the Log outputs. | *'''Colour'''<br>This is the color name that is reported to the Log outputs. | ||
<br> | |||
[[Image:State Editor.jpg]] | |||
<br> | |||
=== Changing States During a Run === | |||
Changing of the Standard Portal States is handled automatically for you by Planimate. | |||
Once you specify Custom States, then you are responsible for managing the changing of these states. Portal State changes are changed through routine code. | |||
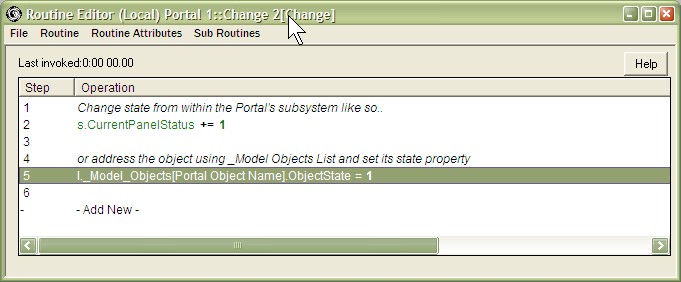
The following examples show how to change Portal state in a routine in a change object. | |||
[[Image:CurrentScreenStatus.jpg]] | |||
<br> | |||
=== Displaying Portal States as Text (Labels) === | |||
You may wish to display text labels for each state as well as an icon image. | |||
To do this, you need to: | |||
To do this, you need to: | |||
#Prepare a label list with the text labels you want to associate with the state. | #Prepare a label list with the text labels you want to associate with the state. | ||
#Create an Attribute or Table in which to record the state value. | #Create an Attribute or Table in which to record the state value. | ||
#Provide a view of this attribute or table cell on a panel or screen. | #Provide a view of this attribute or table cell on a panel or screen. | ||
| Line 62: | Line 62: | ||
Once you elect to customize portal states, the standard states are not used. You can revert to the standard states if you delete all customized states you have added. | Once you elect to customize portal states, the standard states are not used. You can revert to the standard states if you delete all customized states you have added. | ||
[[Category:Object/Portal]] | |||
Revision as of 12:11, 3 April 2009
Customization of Portal States
The Customise States Portal Data menu option enables you to replace the standard Portal States (Idle, Busy) with a set of states that you define yourself.
For each state you can select a state name, a value and an icon. Customised states are changed by operations in routine code.
Adding States
After selecting Customise States, a window appears in which you add and edit the Portal states.
Then you will be offered a window from which you can select an icon the portal will display when it is in this state.
After you select an icon, the state is added to the list.
You can then right click on a state to edit its other state parameters:
- Name
Optional, but it is useful for remembering the state - Index
An integer value. Change this to re-order the state listing. - Colour
This is the color name that is reported to the Log outputs.
Changing States During a Run
Changing of the Standard Portal States is handled automatically for you by Planimate.
Once you specify Custom States, then you are responsible for managing the changing of these states. Portal State changes are changed through routine code.
The following examples show how to change Portal state in a routine in a change object.
Displaying Portal States as Text (Labels)
You may wish to display text labels for each state as well as an icon image.
To do this, you need to:
- Prepare a label list with the text labels you want to associate with the state.
- Create an Attribute or Table in which to record the state value.
- Provide a view of this attribute or table cell on a panel or screen.
In the same routines above, you can add extra operations to set the attribute to match the state.
Note:
Once you elect to customize portal states, the standard states are not used. You can revert to the standard states if you delete all customized states you have added.


