How to Build a Spatial Link Network: Difference between revisions
(Created) |
mNo edit summary |
||
| Line 3: | Line 3: | ||
Follow these steps to quickly put together a Spatial Link Network. | Follow these steps to quickly put together a Spatial Link Network. | ||
=== | === Step One: Create Portals as your network nodes. === | ||
Select Portal Objects from the Object Palette and lay them out. | Select Portal Objects from the Object Palette and lay them out. | ||
| Line 9: | Line 9: | ||
Rename the Portals to the Location Names you want for them. | Rename the Portals to the Location Names you want for them. | ||
=== | === Step Two: Connect Portals with Spatial Links === | ||
Click on the Spatial Link button in the Object Palette. | Click on the Spatial Link button in the Object Palette. | ||
| Line 15: | Line 15: | ||
Click on a Portal you want to be the origin for the Link. | Click on a Portal you want to be the origin for the Link. | ||
<br> | [[Image:Splink Build Step 2a.jpg]]<br> | ||
Click on another Portal you want the Link to connect to. | Click on another Portal you want the Link to connect to. | ||
<br> | [[Image:Splink Build Step 2b.jpg]]<br> | ||
A prompt box will appear to name each new spatial object before the link is created. | A prompt box will appear to name each new spatial object before the link is created. | ||
<br> | [[Image:Splink Build Step 2c.jpg]]<br> | ||
The link will now be completed, and you can click on it to add bends set colour, width other options. | The link will now be completed, and you can click on it to add bends set colour, width other options. | ||
<br> | [[Image:Splink Build Step 2d.jpg]]<br> | ||
If the Model’s update interval has not been set, Planimate® will apply a default of 10 seconds, to ensure your items animate across the links when next you run. You can adjust this Update Interval to alter the smoothness of th animation from under Run in the Menu Bar. | If the Model’s update interval has not been set, Planimate® will apply a default of 10 seconds, to ensure your items animate across the links when next you run. You can adjust this Update Interval to alter the smoothness of th animation from under Run in the Menu Bar. | ||
=== | === Step Three: Specify Transit Target === | ||
Place a change object inside the original Portal. | Place a change object inside the original Portal. | ||
| Line 39: | Line 39: | ||
Add a “Spatial Link” operation to the Routine to specify the Transit Target. It will look like this: | Add a “Spatial Link” operation to the Routine to specify the Transit Target. It will look like this: | ||
<br> | [[Image:Splink Build Step 3.jpg]]<br> | ||
=== | === Step Four: Specify Transit Time === | ||
As with the Transit Target editing, click on the change object and select Run Routine, then add an operation to edit the transit time by clicking the space bar. It will look like this: | As with the Transit Target editing, click on the change object and select Run Routine, then add an operation to edit the transit time by clicking the space bar. It will look like this: | ||
<br> | [[Image:Splink Build Step 4.jpg]]<br> | ||
=== | === Step Five: Final Structuring === | ||
Add the path to direct the item, and place a capacity object before the Portal Exit. | Add the path to direct the item, and place a capacity object before the Portal Exit. | ||
<br> | [[Image:Splink Build Step 5a.jpg]]<br> | ||
Check that the Routine in the Change Object is set to “Only when Item take Path”. | Check that the Routine in the Change Object is set to “Only when Item take Path”. | ||
<br> | [[Image:Splink Build Step 5b.jpg]]<br> | ||
You can now test your item’s traverse along the Link during a run. | You can now test your item’s traverse along the Link during a run. | ||
<br> | <br> | ||
[[Category:Object/SpatialLink]] | |||
[[Category:Spatial Network]] | |||
Latest revision as of 10:47, 6 March 2009
Building a Spatial Link Network
Follow these steps to quickly put together a Spatial Link Network.
Step One: Create Portals as your network nodes.
Select Portal Objects from the Object Palette and lay them out.
Rename the Portals to the Location Names you want for them.
Step Two: Connect Portals with Spatial Links
Click on the Spatial Link button in the Object Palette.
Click on a Portal you want to be the origin for the Link.
Click on another Portal you want the Link to connect to.
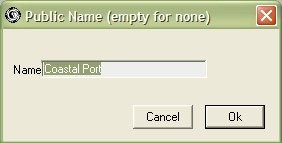
A prompt box will appear to name each new spatial object before the link is created.
The link will now be completed, and you can click on it to add bends set colour, width other options.
If the Model’s update interval has not been set, Planimate® will apply a default of 10 seconds, to ensure your items animate across the links when next you run. You can adjust this Update Interval to alter the smoothness of th animation from under Run in the Menu Bar.
Step Three: Specify Transit Target
Place a change object inside the original Portal.
To specify the transit target click on the change object and select Run Routine
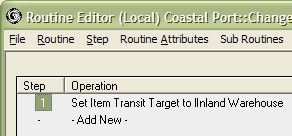
Add a “Spatial Link” operation to the Routine to specify the Transit Target. It will look like this:
Step Four: Specify Transit Time
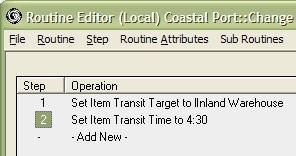
As with the Transit Target editing, click on the change object and select Run Routine, then add an operation to edit the transit time by clicking the space bar. It will look like this:
Step Five: Final Structuring
Add the path to direct the item, and place a capacity object before the Portal Exit.
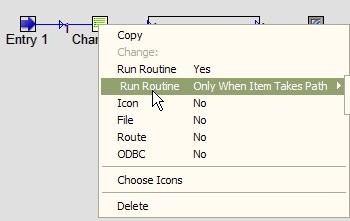
Check that the Routine in the Change Object is set to “Only when Item take Path”.
You can now test your item’s traverse along the Link during a run.


