Basic Planimate® Concepts
Planimate® divides things (entities) into those that tend to remain fixed or do not change, such as doors, machines, personnel at work stations; and those that move within or through the system, such as parts, orders, transactions, customers.
| Planimate®… | .. can be described as: |
|---|---|
| Objects | Entities that can hold and/or transform other entities.
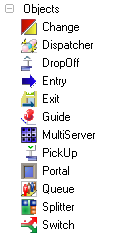
You can have as many objects as you like in a model. Planimate offers a range of generic objects with relatively simple user-selectable attributes and behaviour. They are found in the Tools Menu sidebar under Object. You can produce more complex behaviour by combining objects together. |
| Items | Dynamic Entities that enter, move through and exit the system by way of passing from one object to another.Planimate organises groups of like Items into CLASSES. They are found under Classes in the Tools Menu sidebar.
A Planimate® system model can contain many Items, and Item Classes. The movement of Items is normally animated during a simulation. |
| Paths | Sequence of Steps followed by an Item defining its movement from one object to another.
The sequences are defined by the modeller for each item class. Items step from object to object through the system during a simulation and this stepping is animated. Items in each Class share the same paths through the system. |
| Interactions | When Items meet Objects there will be an interaction.
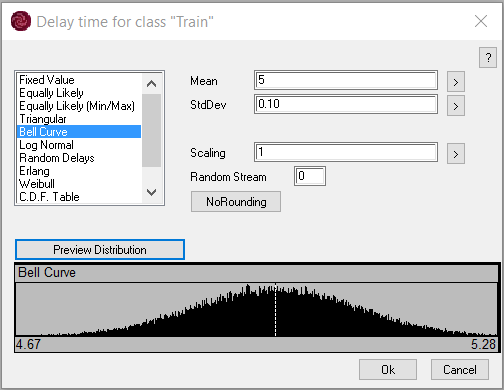
The interaction can be simply that the item will be held in the object until it can move on. The object may also perform some process or operation on the item, which takes some time. This time can vary from on item to the next, according to a pattern of variation you specify. |
| Flows | The collection of paths that are defined for an Item Class is called the Flow. During a simulation run, many items move along flows. |
Running a Dynamic Model
The specification for a model in Planimate includes events where items arrive into the system. These arrivals can be either a fixed or varying schedule of Item arrivals, which occur in certain objects. After specifying these arrivals in the system model, you can invoke them. Once the items arrive, they cause more events to occur, until there are no more events. This is called “Running the Model”. Once received by the system, an item will visit one or more objects according to its flow. The flow may have many options within it. The path that the item uses might be influenced by the interactions it experiences along its journey. Interactions that involve process delays result in time passing in the run, and this is managed using the simulation clock.
The Simulation Clock
In a system, and also in a Planimate® model, events take place at certain times. Our model is its own little universe, and requires its own time scale. This is provided by the Simulation Clock. In your system model there may be some time lapse between one event and the next. In order to avoid wasting your time, and to accelerate the pace of the model run, Planimate will not simulate the passage of time between the events, but will instead ‘jump’ straight to the time of the next event. You will often see the simulation clock flick to the time of that next event. Events in your system can occur simultaneously. Planimate® can only process (and animate) one event at a time, but it manages its time-keeping to make sure that these events are recorded as occurring at the same time according to the simulation clock.
The Model Building Process
The process of building a model in Planimate® involves 4 distinct views:
| 1. Object Editing. | 
|
| 2. Flow Editing. | |
| 3. Interaction Editing. | |
| 4. Paint Layer Editing. |
Building a model will involve working in each view.
You are free to change views at any time if you want to alter something edited in that view.
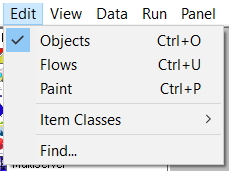
| Object | <Ctrl-O> | Object Edit View. | Add and position simulation objects. |
| Flow | <Ctrl-U> | Flow Edit View. | Create and edit item flow paths. |
| Paint | <Ctrl-P> | Paint Edit View. | Create / edit background graphical objects and images. |
In each of these views, you can click on an object, or click in the screen background to raise a menu.


