Customised Cell Context Menu
Customised Cell Context Menu
You can setup your own customised Cell Conext Menu for table views when the user clicks on a cell in the table.
You'll need a viewing panel and a logic panel (preferably beneath the viewing panel in heirarchy) and a table to view (Table1a).
== SETUP THE TABLE ==
Add the view of the table to the viewing panel (this can be performed whilst on the viewing panel ; from the Planimate menu select Data -
Tables... and select the table. Then from the menu select View, then select Table. The table will appear on the panel.
Create a broadcast (eg UserClick) for when the user clicks the cell.
Right click on the viewed table and for the Cell Click Broadcast select the UserClick broadcast from the list.
Right click on the viewed table and select Options.. Select - In Place Edits Send Broadcast After Edit Single Click to Edit No Cell Menu
NOTE: if you don't select the 'No Cell Menu' the default Planimate cell context menu will appear if right click on table (in user mode).
Make sure the table has some rows to edit.
== SETUP LOGIC ==
Create a Label List called menu_text that is scoped to the Logic Panel. Add some labels to the lsit depending on the purpose of the menu (eg Insert Row, Append Row, Delete Row). Also add a '-' to the label list, this
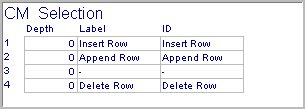
is used to create a seperation line within the menu (ie to seperate different actions). Create a table (CM Selection) for the details of the menu selection. It will have three columns: Depth (value) Label (lbl.menu_text) ID (lblmenu_text)
For each option in the menu add a row to the CM Selection table (and also if any seperation lines are needed). For the Label column (and ID column) select the appropriate label for each option row (ie Have four rows and Row 1 is Insert Row, Row 2 is Append Row, Row 3 is -, Row 4 is Delete Row).
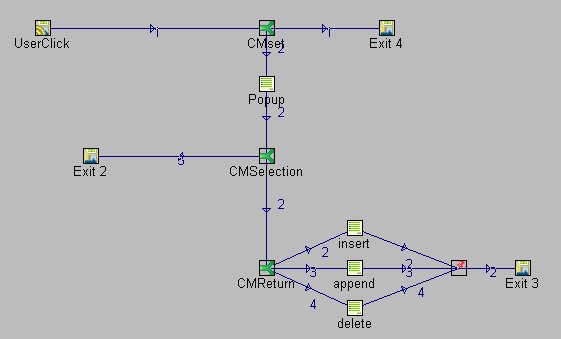
Add a entry on the logic panel, and right click to change the mode to Receive Broadcast. Add a switch with a condition "If i_contextclick=0" Add an exit and connect the broadcast entry - switch - exit with a flow. This flow to the exit will be followed if the user has not right clicked on the cell, and alow the user to edit the cell witha left mouse click. If the user had right clicked on the cell, the item attribute would be equal to one.
Add Portal Attribute p.CM_Return
Add a change object and use as a routine object. Add a line using the operation HandlePopupMenu. The result will be the portal attribute p..CM_Return, and the table will be CM Selection. Add an alternate flow path from the Switch that is checking for right mouse click, and link to new routine for the handle popup menu (HPM).
After the HPM routine add a switch to check for a selection. Condition is "If p.CM_Selection > 0". After the Selection switch add another switch for the Return. Connect the paths from HPM routine, through the Selection Switch to the Return Switch.
Add an exit near the Selection Switch and add a new flow path to the exit (the when user has not selected from the menu i.e. p.CM_Selection = 0).
For the Return Switch it's mode is Multiple Conditions. For the Condition List add a condition for each menu option (except the '-' line seperator).
For Example: Name Result Path Condition Insert 1 2 p.CM_Return = l.Insert Row Append 2 3 p.CM_Return = l.Append Delete 3 4 p.CM_Return = l.Delete
Create the appropriate change objects for each result/path option. NOTE: Use the items _row and _col to interpret which cell the user has clicked in.
Connect the flows/paths to the appropriate change object. Add a guide to link, and link back all the flows after the change objects. Add an exit, and link the guide to the exit.
Save your work. Navigate to the Veiw Panel, enter user mode (Ctrl-G) and rick click on a cell in the tab

