Category:Panel: Difference between revisions
(Printing Panel) |
No edit summary |
||
| Line 1: | Line 1: | ||
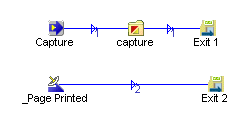
Printing a Panel can be achieved by using the Change Object with File mode 'Save Window Image', and also including a broadcast receiver for the broadcast '_Page Printed' when panel printing complete. | Printing a Panel can be achieved by using the Change Object with File mode 'Save Window Image', and also including a broadcast receiver for the broadcast '_Page Printed' when panel printing complete. | ||
Basic: | '''Basic:''' | ||
1) Add a Panel to the Panel List (right click on panel and select from the Dynamic Panel Properties menu 'Add To Panel List'. | 1) Add a Panel to the Panel List (right click on panel and select from the Dynamic Panel Properties menu 'Add To Panel List'. | ||
2) Create an entry, change object, and exit. Link all with a flow. Change mode of entry to Upon Click (and continue), and rename as Capture. | 2) Create an entry, change object, and exit. Link all with a flow. Change mode of entry to Upon Click (and continue), and rename as Capture. | ||
| Line 15: | Line 16: | ||
8) Go to Planimate run mode and click the Capture entry. | 8) Go to Planimate run mode and click the Capture entry. | ||
9) Navigate to folder where image was saved and view captured panel image. | |||
[[Category:Panel]] | [[Category:Panel]] | ||
Revision as of 09:03, 5 December 2008
Printing a Panel can be achieved by using the Change Object with File mode 'Save Window Image', and also including a broadcast receiver for the broadcast '_Page Printed' when panel printing complete.
Basic:
1) Add a Panel to the Panel List (right click on panel and select from the Dynamic Panel Properties menu 'Add To Panel List'. 2) Create an entry, change object, and exit. Link all with a flow. Change mode of entry to Upon Click (and continue), and rename as Capture. 3) For the change object select File, and change the Mode to 'Save Window Image'. 4) A window browser will appear; type the name to be used when saving in the 'File name:' section. 4) In the change object Options select 'Show file browser first' if you would like the user to be able to name the file , and/or save the image to another folder. 5) In the change object Data Targets select Add New. From the Attribute Reference Selector in Mode Value change the Attribute Type to Label and select _Model Panels from the list. For the Name select from the list the panel added in step one.
6) Create a entry and exit. Link all with a flow. 7) Change the entry mode to Receive Broadcast, adn select _Page Printed from the list. Note: this broadcast is received from the system when the page has been printed.
8) Go to Planimate run mode and click the Capture entry. 9) Navigate to folder where image was saved and view captured panel image.
Pages in category 'Panel'
The following 15 pages are in this category, out of 15 total.
